The EZ Necklace helps you plan the focal beads on a multi-strand necklace. This is impossible to do with the strands lying flat on a table or beading board!
Made of heavy roller polished vinyl for years of beading fun.
Ships flat and easy to assemble into a cone using the adhesive strip.
The EZ Necklace is lightweight for making beaded necklaces. It is not suitable for working with wire.
The EZ Necklace can also work as a sizer to help determine the length of a necklace, especially one with really big beads.
Start here: How long do you want the shortest and longest strands?
Measure your neck for the shortest strand.
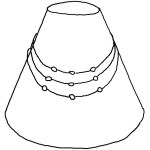
The finished necklace will have the focal beads lined up.
String the first strand and tape it at the shortest measurement mark.
First strand, side view.
String just the focal bead area of the 2nd strand.
2nd strand, side view.
As you progress, each strand gets taped at the shortest measurement where the clasp will go.
Focal beads are lined up! Time to string the rest of each strand.
Temporarily crimp all strands.
Done! Everything is lined up. Time to put the clasp on!
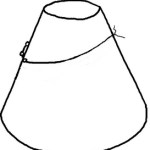
How to assemble the EZ Necklace
1. Remove cellophane strip to expose adhesive.
2. Roll the device into a cone shape matching up the Right Edge (next to the “E”) to the Left Line (next to the “Z”). Press the overlapping edges to seal them.
3. If you goof, pull the seams apart and try again. The adhesive bonds fully with time.